
This setup will make tool changes with M6 much faster. It also allows you to run 1 file for an entire setup. This way, you can set up your material and not have to maintain a position that can allow a touch off later on. usually, if being good with material and not wasting it, you do not have a place to touch off the next tool that was the original location on the material. it is gone at some point in the job.
This setup allows you to zero your first tool and then it moves to a fixed location to record the machine position once it probes another plate. This is stored as what the correct z height should be for this job at this location.
Later on, when M6 is called, the tool goes to a tool change location. You change the tool and then the tool moves to the fixed plate and probes it. It measures that location and then sets the current location to the first measured z height. The newest probed position is now the one it will use later for more tool changes.
It is a simple concept that requires zero math. I spent days convinced I needed functions that were way more complicated. I removed all of them. Simply saying that a bit at this height should be at this height. Next bit is not at that height, so set the current height to the original height.
I have been wanting this simple capability in my setup ever since I switched from Mach 3 to Mach 4. I used a screenset in Mach 3 that gave me this capability. There were some issues with it that I was able to resolve. The main issue with the Mach 3 2010 screenset from Ger at this page is that it was too minimal. You have to memorize what buttons do or look them up when you forgot.
The other issue was that I would have issues every so often when setting up a job. Sometimes, for no reason that I could determine, after you set the machine 0 location it would run wild and plunge into the bed. I cannot explain that at all.
With my Mach 4 screenset, I was able to use the profile that Avid CNC created and then modify the capabilities without changing anything in the configuration of the profile. Just using Lua commands to pull in data and write new data.
I have added the needed files to my Github and have information about how to get it into your setup or use a modified profile to add it to the new profile. There is not a straight forward method of only adding the needed changes though. If you have ever tried to work with mach 4 in editor mode, you know what I am talking about. Lua and the gui modification, in my opinion, suck. Typical to everything the company who created mach has every done, they chose something almost nobody uses and documentation is hard to figure out unless you spend a lot of time testing things until it makes sense.
There are some videos on youtube that can help in this understanding. I have them at the bottom of my github page for this project. The missing manual video is not very explanatory but, it will give a wide overview of how to think when programming for mach 4. The rest of the videos out there are upwards of 7 years old. They add up to be several hours in length and you will probably have to watch them several times while practicing. DazTheGas is the guy who put out the most relevant information. Through his videos and his posts throughout several forum communities, I was able to piece together the understanding I needed.
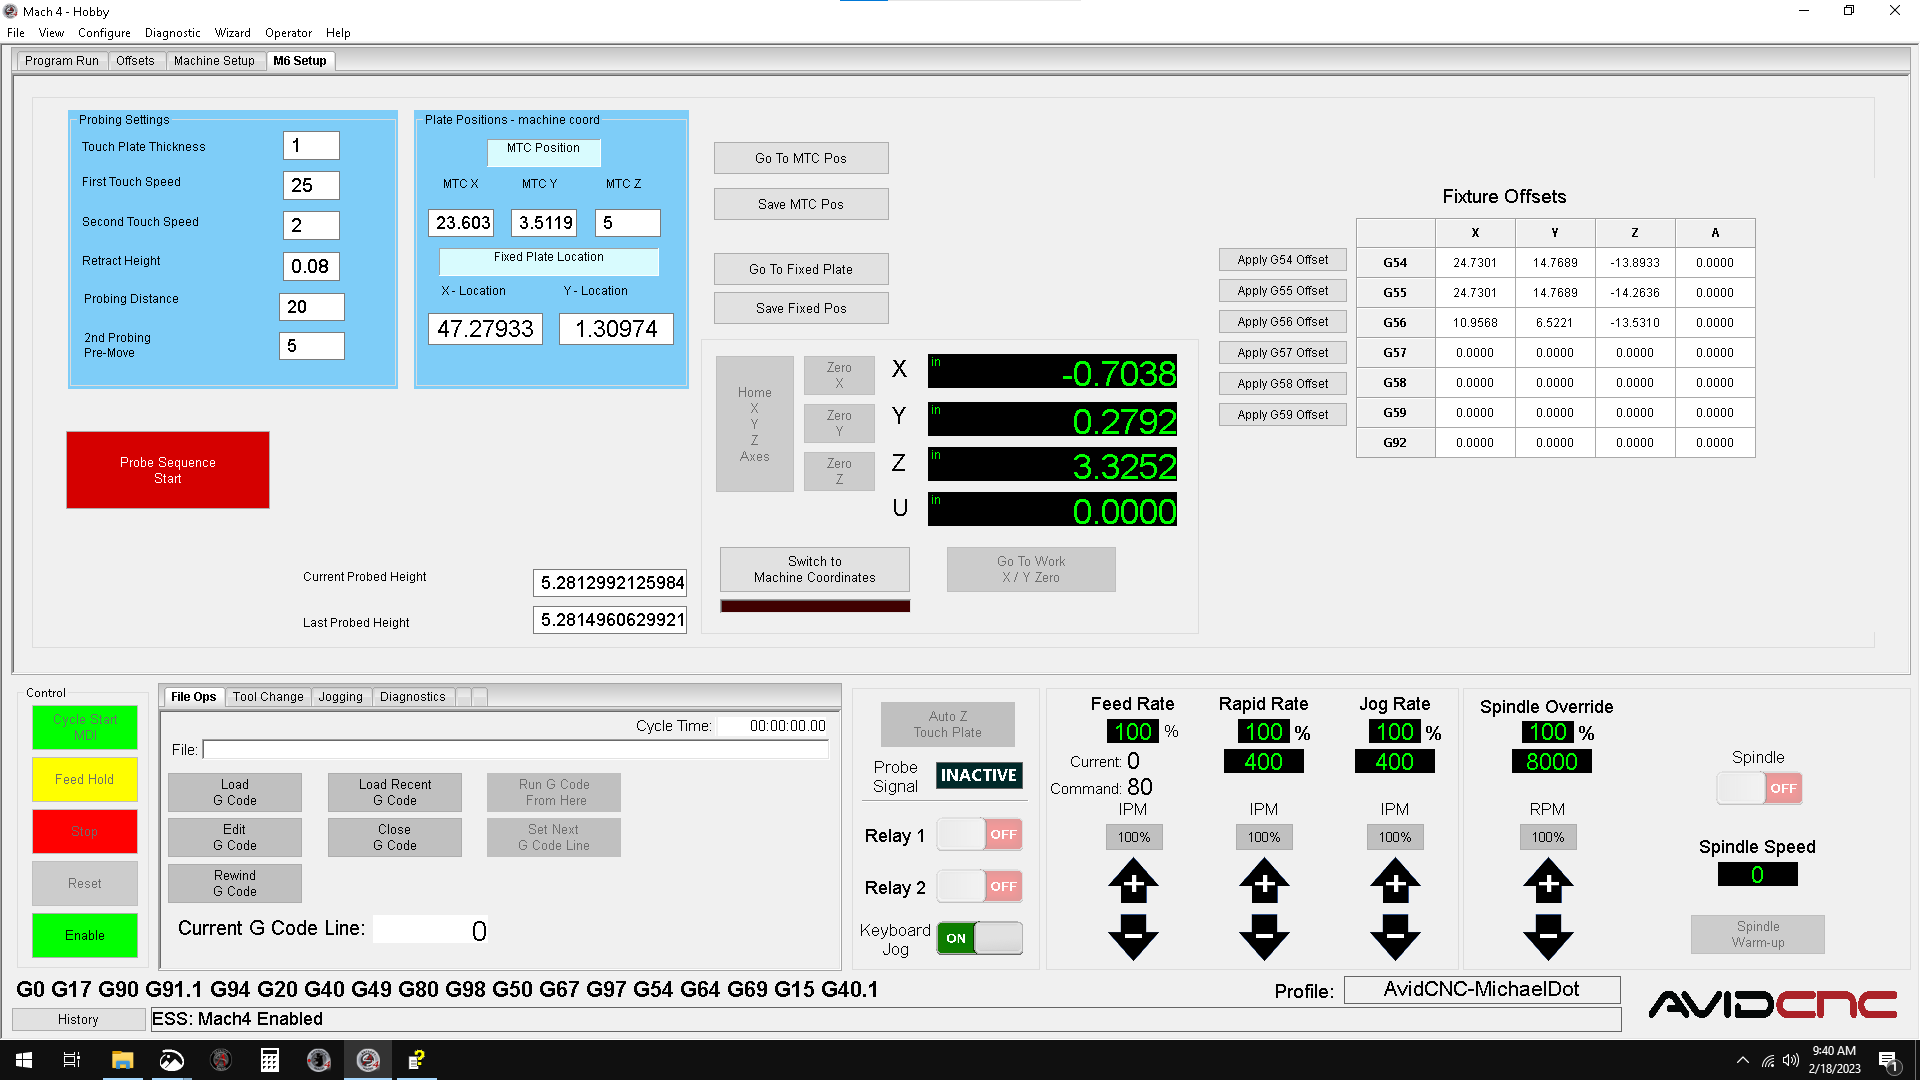
Let me explain a few things in this screenset, I may go in and change some things as I come by them or think about new things to add. As of now, I have a few sections that allow putting in data or capturing that data by pressing a button at a position. Below the image is a description of what is available in the setup portion.
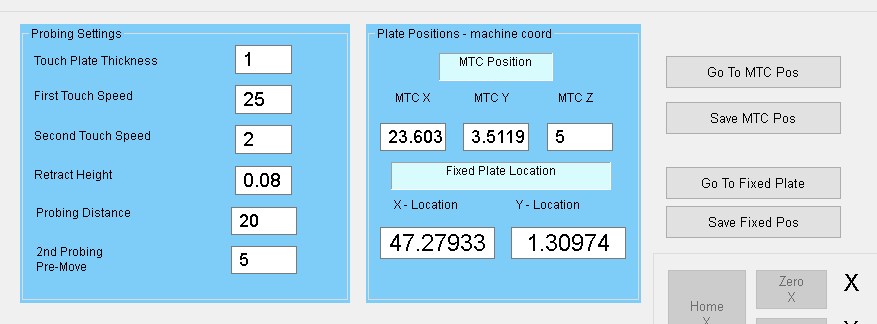
## 1. On the left top there are variables to set your probing settings up.
* Touch Plate Thickness - used to set the thickness of the moveable plate to subtract from the probing of the surface in step 1

* First Touch Speed - The speed when finding the first touch

* Second Touch Speed - to move slower after finding the plate

* How far to move up after touching

* How far to set the probe move to before stopping. I have disabled soft limits of the z in order to be able to call this and enabled at the end

* 2nd Probing pre-move - after moving to the fixed plate the z axis will move this distance before starting the probing. Allows for getting to the plate faster
## 2. The plate positions section
* you can enter the MTC position manually in machine coordinates or jog to the place you want to change your tool and press Save MTC Pos. It will move up to z0 machine pos, rapid to the MTC location and then move to the z height it is set to.

* Fixed Plate Location in machine coordinates. The same thing works here other than it only moves to xy location because tool heights are different. You can use the 2nd Probing pre-move entry to tune this for your job.
Final Screenset Layout
You will need 2 plates to use this setup. You could use 1 and move it to a fixed location after the fact. However, having one that stays where it was when touched during setup will make things much easier. My current plate can be move out of the way for material loading. Then put back into place after it is loaded. The current issue I have is that the mount is printed and it cracked at one point. So, there is a wobble in it now.
I have not created any videos of this working yet. I worked so long on getting this figured out that I got a bit burnt out. I am also redesigning my fixed touch plate because the current one is not rigid enough any longer. I will add that design to my github when ready.


Leave a comment